Ah-Ha! moments on my handstand journey
FIRST THINGS FIRST:
1: Strengthening wrists, arms, and shoulders
2: Gain Mobility in the hip area and Flexibility in the shoulders and Hamstrings
Put a small piece of the item where you should gaze to go upside down. My best gazing point for handstand is between both wrists, the bottom of the palms. That is where my neck and head position is neutral and feels comfortable for handstands. One single point is the best for the brain to avoid any distraction.
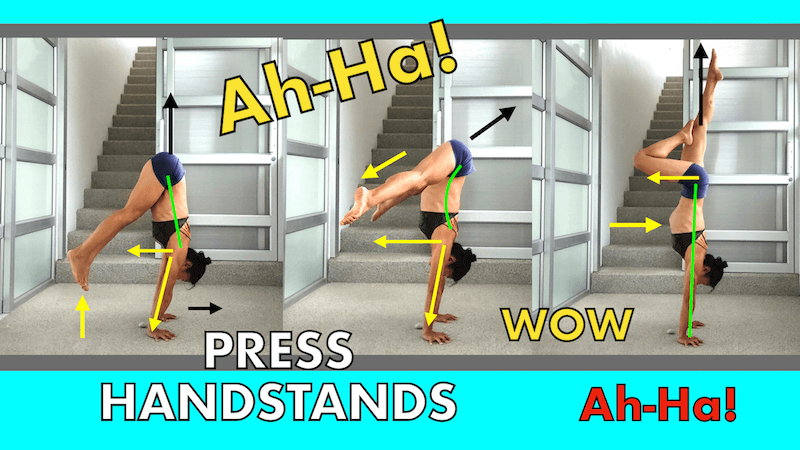
# 2 Ah-Ha: Elbow Lock
Starting with straight arms makes the press so much smoother, I squeeze my elbows firmly in toward the torso, outwardly rotated, and lock the elbows before doing something else to press.
# 3 Ah-Ha: One Leg At A Time With Hip Rotation
It's easier to lift, and if the first foot is off the ground, twist your hips outwardly to lift the second foot.
# 4 Ah-Ha: Pointing Toes in Straddle or L-Shape
I intentionally point my toes as soon as my toes come off the ground. It gives me a solid foundation to adjust the fine alignment in my shoulders and arms before I send my legs up to the sky. It never works well for me when I am still unstable/wobbly and forced to shoot my legs up. I rather adjust my bottom half alignment from wrists to hips and make sure to stabilize my arms and shoulders in the right position. All I need to do after that is keep my hip directly over the shoulders. It’s that simple.
# 5 Ah-Ha: Shouler Flexion/Elevation with Opposing Force Mechanics
This one was huge for me. I was struggling to adjust my neck and shoulder position for a comfortable zone to push out my shoulders properly. My arms tend to collapse while I practice Handstands and it is exhausting to hold a long time for different transitions and shapes. What I changed is I push out and forward my shoulders, after I press and hover my legs. Forward in an upside-down position means pushing my shoulders where the chests are facing. To do this you need a counter push in the opposite direction. I send my sit bones backward, arching my lower back. This counter force like pull and push is a game changer in an upside-down position. My shoulders can be much more open and the range of motion gets better. I can shift my shoulders upward more freely. I then could understand better what “shoulders to the ears” is all about! I can push out my shoulders a couple of inches higher and squeeze the elbows narrower toward each other. That sensation was a miracle.
To summarize, here are the form cues, among the many, that I think you should focus on more when starting:
When initiating the press into a handstand, your elbows must be straight. Having flexed elbows would be very tiring strength-wise. If you are unable to straighten your elbows when doing the handstand, you might need to work on shoulder flexibility and upper back muscles. Practice as often as possible to get what is need to be done.
Regarding shoulder positioning, the most important thing you can think about is pushing away from the floor. When in the handstand position, try to push your head as far away from the floor as possible. This is called elevating your shoulders and will achieve the desired shoulder position for a correct handstand. But again, to be able to push away from the floor requires shoulder and arm strengths. Just keep practicing until you get that strengths.
Another thing to keep in mind regarding your shoulders is to flex them. It may take a long time to develop the mobility and strength required to flex your shoulders, so my suggestion is to work on your shoulder mobility on the side. Don’t stress about achieving a straight line by flexing your shoulders enough, because it may take some time.
Practice from the bottom A solid foundation is everything. Our human bodies are not designed to stand on our hands but our feet, right? I mean by “practice from the bottom” by handstand body position. Starting with the wrists, elbows, shoulders, scapula, neck, spine, rib cage, core, hips, legs, knees, and toes.
If we need to walk or stand, we need toes, heels, ankles…holding balance, moving forward-backward, everything is happening from the bottom.
Daily Practice is the Key
The best friend for handstand improvement is, therefore…….REPETITION.
We need to educate our bodies thousands and millions of times to learn the handstands. When we see perfect handstand performers, we should admire and recognize how many times and years that person practiced and failed to reach that level. There is no way that we can negotiate with practice to make shortcuts.
To achieve the press handstand, we need a certain amount of strength in wrists, arms, and shoulders, mobility in hip joints, flexibility in hamstrings & shoulders, and the technique to put all the components together at the right timing. But you don’t need to be super strong. I hope your handstand journey will be coming along.
Please feel free to comment with any questions or feedback on the blog. I am happy to to share your thoughts! That's all abot this blog.
Thank you guys so much for reading this article so far and I would very much appreciate any comments below what kind of contents you would like to know in the future.
This post has a lot of value!