The hand positioning for the handstand is very fundamental. In what way should we place our hands on the floor? Where should be the fingers pointing? In this article, I am going to talk about the basics of the hand position for beginners.
Anyway, I try to describe major hand positions useful for you. For more advanced handstand practitioners, it depends on the style you choose. I encourage you to play with all of the variations to discover which fits your style best. Let’s dive into it!
Hand Position:
Palms:
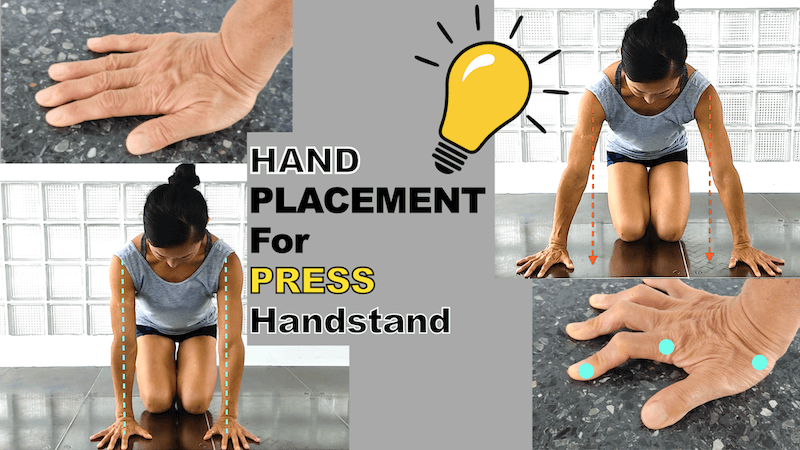
Ideally, your hands in a handstand are directly placed under your shoulders. That means, palms as wide as shoulders. It’s the same as if you stand on your feet – if you put your feet too close together, you have a smaller base and weaker balance. If you put your feet too wide, you have a great base but your front-to-back stability is going to be weaker (which you can use in a handstand).
In both cases – too wide or too close – you have to use more muscle strain to hold the position. Therefore it is ideal to start in a position in the width of your shoulders. Check yourself in the mirror where your both arms are pararell each other.
A closer handstand, a closed position of hands, is good for having control over the distribution of weight on your hands. If you “press” more on one hand and you have more weight on it than in a close position you’ll fall on the other side.
In a handstand, your wrists are transformed into ankles, elbows into knees, shoulders into hips.
Index fingers are parallel and point forward. The rest of the fingers are spread sideways. Fingers spread out are good but spreading too wide away from one another is not the best, as it makes the hand structure weak. More open shoulders will benefit from hands slightly closer together. Tighter shoulders will benefit from hands slightly wider than shoulder distance.
More open shoulders will benefit from hands slightly closer together. Tighter shoulders will benefit from hands slightly wider than shoulder distance. There is no one size fits all.
Beginners often place their hands wider because they lack the required shoulder flexion and external rotation to bring the hands closer together. The optimal hand-width when learning the handstand is shoulder-width apart.
For those who struggle with shoulder external rotation, having the gap between your hands narrow and turning your hands out a bit can help open your shoulders up and lock them into a better line.
Since you can fall only forward or backward, you will have the most control in aligning your strongest fingers in the direction of your balance. In this case, try to have either the index or middle finger of each hand facing forward. Having them turned in too far puts extra pressure on the wrists while having them turned out too far makes it more difficult to control balance.
If you’re unsure what width is optimal for you, I recommend starting by having the hands pretty much under the shoulders directly. This will ensure the best stack, and make sure the weight can be in the middle of the hand and your joints can stack most efficiently. But if things don’t feel quite right, start making minor tweaks in both the width of your hands in conjunction with the external or internal rotation of your wrists.
Fingers:
The index and middle fingers have the most power. They do the most work of all for balancing. We rely on them in terms of balance, other fingers are not much important. When pressing down in a handstand, try to press into the first knuckles of your index finger the most.
The index and middle fingers have the most power. They do the most work of all for balancing. We rely on them in terms of balance, other fingers are not much important. When pressing down in a handstand, try to press into the first knuckles of your index finger the most.
The magical little adjustment that can change your handstand game is called “Spider Fingers”.
When you put your hands on the floor and do a handstand, imagine you are grabbing the ground. So whenever you are falling over in a handstand, you should press your fingers down like there is no tomorrow! Ultimately the thing that will keep you balanced, regardless of hand orientation, is applying pressure to the floor. So if you struggle in pushing back against overbalance in particular in a flat hands position, see if switching to this shape gives you a better chance to give your hold.
But, if you are not falling over, be careful about pressing too hard. Pressing too much will just make you fall back from your handstand. If you are stable, a light squeeze towards you is more than enough. It is all about the balance between pushing too much and not enough.


3 Main Contact Areas:


Having your hands flat gives you a wide surface area, which allows you to control your weight distribution to find and catch your balance. Many who grip the ground with flat hands also spread their fingers far apart, which can give you some more lateral control.
If you want to progress to higher handstand specific skills, like shape-changing or one-arm handstands, practicing a narrower, shoulder-width stance will be beneficial in the long run. And if you can do both, choose your width based on what you want to do in that session.
Ultimately, hand positioning for handstands is largely a personal preference. No one size fits all of us.
About this topic I have a video. Click the video down below:
Closing Words:
There is no one particular form of hand placement, Some people need a wider position, some less. Spread the fingers far apart or less, it’s all individual and may vary.
The more you train and experience a handstand, the more you will start to “play” with it and explore different positions – sometimes wider, sometimes closer. Just like with everything else, each of us has individual strengths and weaknesses. Handstands are so handy that you dan do them everywhere anytime, it also depends on where you do the handstands, or what kind of surface, and your condition of the day. You don't have to achieve perfect performance every single day. Just relax, practice as much as you can and there is tomorrow for you to practice.
Explore as much as possible to discover what works for you and what feels the best. For the hand placement in the handstand most importantly "feeling comfortable" in any stage of holding position is the top secret. Find your happy position and enjoy your handstand journey.
I hope this article could provide you with some new ideas for your practice. Happy handstanding, dear handstand lovers!
Please feel free to comment with any questions or feedback on the blog. I am happy to to share your thoughts! That's all about this blog.
Thank you guys so much for reading this article so far and I would very much appreciate any comments or any kid of question about this topic.
Be strong, be safe and try harder! See you in my next episode....
Great article ! Thank you! Good to know that ultimate ly there is no right or wrong position It depends on your goals and shoulder mobility
You have done an impressive work on your website in covering the topic.
I am learning handstand by watching your articles, However I want to understand the palm and finger alignments.
So do i have to keep my index and middle finger straight (straight align to my wrist) ?
Thanks,