April 7

0 comments

Do You Need To Be Strong To Do A Handstand?

By Yasuko

April 7, 2022

Press Handstand, Handstand Coach


Answers:    

Contrary to popular belief, the handstand doesn’t require that much strength, if you can hold yourself upside down against the wall for 30 seconds. Most people who can hold a minute plank are closer to a handstand than they think. But that's just one of the requirements — you also need balance, flexibility, and confidence.

Only being strong is not enough. You need to integrate techniques. Most importantly what kind of approach and which drills you choose is the key to your success. You don’t need to be an athlete or calisthenic enthusiast. Handstand is absolutely accessible for everyone. All you need is your passion.

In this article, I will go over what is essential components to doing a handstand and how you can prepare your body for handstand practice. There are certain key elements that will be helpful to keep in mind for anyone training in the handstand. Knowledge is power. Avoiding mistakes and practicing efficiently and effectively is the shortest way to your goal. Let’s dive into it!
The handstand- It’s an incredible skill to learn for many reasons, it’s fun, and has endless variations and progressions. but most importantly it is about mastering something previously impossible.
Essential Components for Handstand Skill

1. Strength + Flexibility + Mobility
- Wrist: Strength and Flexibility support your entire body weight
- Elbows: Strength to keep arm stretched and keep elbows locked
- Shoulders: Strength and Flexibility to push and extend overhead on your arms
- Hamstrings: Hamstring flexibility makes press /float to handstands easier
- Hip Flexion + Core Compression: The ability to bring the legs into the body. The compression requires hamstring flexibility and core strength.
- Scapula: Scapula (shoulder blades) mobility for press to handstand


2. Alignment 

Handstand is all about bone-stacking to support your muscles. Once you are completely aligned at 180 degrees, the weight on your arms will feel lighter. Find the alignment as fast as possible.

3. Breathing Technique:

This is the most underestimated factor in Handstand practice. Using breathing technique generate amazing benefits of generating strong force and engaging muscle.

4. Lean How to Exit Safely 
One more major requirement is overcoming fear, mainly the fear of falling. To eliminate your fear of falling over the top, you need to learn how to fail on your arms at the beginning of your handstand journey.

How To Make A Handstand Practice Plan

Step 1: Getting strong enough to Handstand
To do a handstand you need the strength to hold your body weight on your hands. To build-up to the required strength, I recommend a simple drill that you can practice every day. Make sure you warm up your wrists and shoulders first for your joint health to prevent any injury.

Adding regular stretching exercises for hamstrings and hip flexor flexibility is definitely helping your progress.  

Recommended Drills:
Plank to Pike Walk on Chair
Chest to Wall Walk

Recomended Stretches: 

Standing Pancake, seated pancake, and lizard lunge
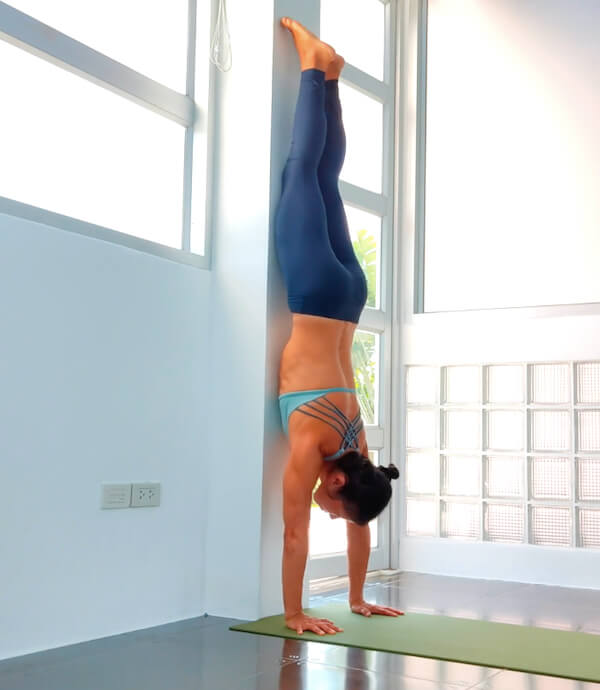
Step 2: Alignment Check on Wall

It is very important to experience the correct alignment for straight handstand alignment. An effective way for alignment check on the wall is chest to wall handstand for helping to create muscle memory for your body once you go upside down. I suggest doing this drill every time before your handstand practice. Your muscles will remember this body position.

L-Handstand against a wall is another perfect way to check alignment. Without knowing what is your ultimate goal, your body can learn bad shape, bad habits, muscle memory, and so on.  Once your body learned the wrong movement patterns, it is difficult and takes a much longer time to re-adjust. Monitor your practice and check afterward to improve for the next session.

Handstand Alignment Check Wall Version
Wall L-shape Alignment

Check-List for Wall Alignment:

  • Wrists shoulder-width apart
  • Fingers pressing against the floor
  • Ribcage lifed + hugged-in
  • Straight arms, rotate the shoulders outwardly
  • Posterior Pelvis + Pubic Bone to the wall (Hollow Back)
  • Active Legs
  • Look to Thumbs (Awareness for gaze and head position)
  • Pointed toes

Check-List for Wall L-Handstand:

  • Check your one leg distance from the wall first and place your hands on that spot
  • Turn around and place the hands on the floor, chest facing the wall
  • Wrists shoulder-width apart
  • Fingers pressing against the floor
  • Choose one leg for support, that toe on the wall just touching
  • Straight arms, rotate the shoulders outwardly
  • Locked elbows, soft side facing forward
  • Sitbone over the back of your head, shoulders over the wirsts
  • Look to Thumbs (Awareness for gaze and head position)
  • Ribcage lifed + hugged-in
  • Posterior Pelvis + Pubic Bone to the wall (Hollow Back)
  • Active Legs
  • Pointed toes
Step 3: Practice breathing techniques for muscle engagement
This is the most underestimated factor in Handstand practice. Using breathing technique generate amazing benefits of generating strong force and engaging muscle. Inhalation is the best for muscle engagement to pressing and lifting force, exhalation is responsible to release the muscle. While you are going up to an upside-down position, a big inhale is the best in my opinion.

Step 4: How to fall from a handstand -  the easy way
You need to learn how to bail out of the handstand. Most of the humans will naturally fall out the correct way in a handstand without even realizing that they are doing it. The most common exit is the side exit - a similar kind of cartwheel. Start from a downward-facing dog just to kick up, choose one leg, aim your leg toward the floor, and travel step aside.  Build the movement pattern in your body. This pattern works for any stage of upside-down angle. Your body will just follow. If you are confident with the cartwheel exit, you are good to go! Practice this as often as you can until it’s second nature.

Summary:

Handstands require the strength of all the major muscles of the upper body. Significantly the arms, shoulders, and pectorals are used in the pushing and steadying of your body against gravity. The latissimus and trapezius also come into play used mostly to stabilize your body in the upside-down position. Your entire back will be worked in this manner.

Learning handstand is a progressive process. You train your weakness, educate your body on what is necessary, and then the first goal for you as a beginner is standing upside-down comfortably 10 seconds, doesn’t matter straight or not. Holding 60 seconds or achieving a straight shape is not the proper goal for beginners. Most importantly your body learns the necessary movement patterns and muscle memory for constant success.  Keep practicing step by step, and build up your strengths and confidence in practice. Add practice habits to your daily life. If you are interested to get started and need instruction for more progressive drills for beginners, check my beginner's handstand program on my website "How It Works" section.

“Start by doing what is necessary, then do what is possible, and suddenly you are doing the impossible.”
– St. Francis of Assisi


Please feel free to comment with any questions or feedback on the blog. I am happy to hear from you. Enjoy your handstand journey!

For an absolute beginner to the handstand, I have an ultimate beginner’s press handstand online program. Check “Home” in Menu above or click the logo on the top.

Yasuko

About the author

My name is Yasuko and I'm passionate about handstands, yoga movement and flexibility.  I immersed myself in research a lot to inspire myself & experiment for physical development. This has led to the person I am today.

Leave a Reply

Your email address will not be published. Required fields are marked

{"email":"Email address invalid","url":"Website address invalid","required":"Required field missing"}